FUSELAGE IV
[11/05/2006]
I had a little bit of time to work on the plane over the weekend, so my goal was to get the boom mounts done. I met that goal for the most part, though there are a couple of small details left to add for later.
 The weekend began where my last effort left off. It had been a couple weeks at least
since I worked on the beast last, so I had to get my head back into that space. I
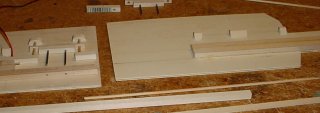
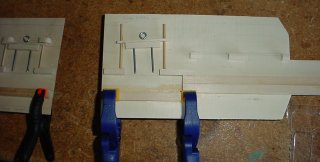
got close to completing the right-hand boom mount (seen on the left in the image),
so my focus was mainly on getting the mount constructed on the left-hand fuselage
wall (seen on the right in the image).
The weekend began where my last effort left off. It had been a couple weeks at least
since I worked on the beast last, so I had to get my head back into that space. I
got close to completing the right-hand boom mount (seen on the left in the image),
so my focus was mainly on getting the mount constructed on the left-hand fuselage
wall (seen on the right in the image).
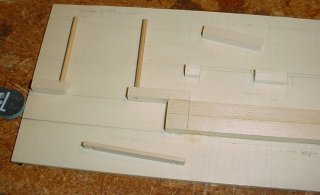 I made the very same mistake I made the first time around by gluing the
upper boom guides to the fuselage wall before drilling holes in them for the
locking pin rails. But I remembered how I corrected the problem, and repeated
the [dangerous] process of drilling the holes. I was successful and so I cut
a couple of wooden skewers to length and inserted them into the holes. One
hole got drilled all the way through, but that won't be a problem.
I made the very same mistake I made the first time around by gluing the
upper boom guides to the fuselage wall before drilling holes in them for the
locking pin rails. But I remembered how I corrected the problem, and repeated
the [dangerous] process of drilling the holes. I was successful and so I cut
a couple of wooden skewers to length and inserted them into the holes. One
hole got drilled all the way through, but that won't be a problem.
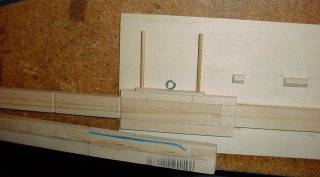
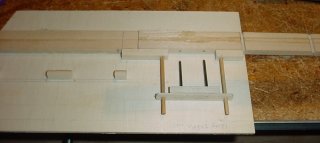 I cut the heads off of two nails and ground down the pointed tips to make them
round, and pressed them into the top block of the locking pin assembly. I cut
and drilled the locking pin cap to fit the rails, glued it to the top block of
the locking pin assembly, and my new locking pin was nearly complete. The assembly
is rotated 180 degrees here from the previous image.
I cut the heads off of two nails and ground down the pointed tips to make them
round, and pressed them into the top block of the locking pin assembly. I cut
and drilled the locking pin cap to fit the rails, glued it to the top block of
the locking pin assembly, and my new locking pin was nearly complete. The assembly
is rotated 180 degrees here from the previous image.
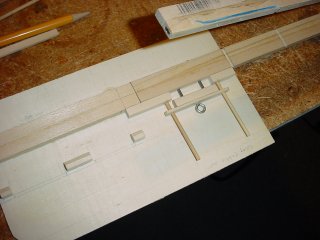 Actually, the previous step was a little more involved than described, as I drilled some pilot
holes all the way through both the locking pin top block and the boom stick to
ensure the pins would line up correctly. Here, the assembly is lined up for a
trial fit. It actually fits too well - it slides right in. I was hoping to be
just a tad bit off like I was on the other side so there would be a little tension
to take up clearances when the pin is inserted. But, the tolerances are close,
so even though the pin fits perfectly, it should work out just fine. I also added
a ring to the locking pin to which a tiny cord will be attached for yanking the
locking pin out when I'm ready to disassemble after flying.
Actually, the previous step was a little more involved than described, as I drilled some pilot
holes all the way through both the locking pin top block and the boom stick to
ensure the pins would line up correctly. Here, the assembly is lined up for a
trial fit. It actually fits too well - it slides right in. I was hoping to be
just a tad bit off like I was on the other side so there would be a little tension
to take up clearances when the pin is inserted. But, the tolerances are close,
so even though the pin fits perfectly, it should work out just fine. I also added
a ring to the locking pin to which a tiny cord will be attached for yanking the
locking pin out when I'm ready to disassemble after flying.
 The bottom boom guide rail had not been installed on either side until this point,
and it was time to install them. I mixed up enough epoxy to do both sides at once,
which almost turned into a disaster, since it was 5-minute epoxy, which didn't leave
me much time to work with the pieces before they set up, or to clean the overspill
before it got too hard to deal with. But I managed, and they came out very nicely
indeed. I'm going to switch to 15-minute epoxy in the future so I have more working time and so
the epoxy gets a better bond, but there should be no problem with the work already
done.
The bottom boom guide rail had not been installed on either side until this point,
and it was time to install them. I mixed up enough epoxy to do both sides at once,
which almost turned into a disaster, since it was 5-minute epoxy, which didn't leave
me much time to work with the pieces before they set up, or to clean the overspill
before it got too hard to deal with. But I managed, and they came out very nicely
indeed. I'm going to switch to 15-minute epoxy in the future so I have more working time and so
the epoxy gets a better bond, but there should be no problem with the work already
done.
 A trial fit of the tail boom in the left-hand fuselage wall boom mount proves that
my work was right on target. It fits just like it needs to fit: snug, straight and firm.
A trial fit of the tail boom in the left-hand fuselage wall boom mount proves that
my work was right on target. It fits just like it needs to fit: snug, straight and firm.
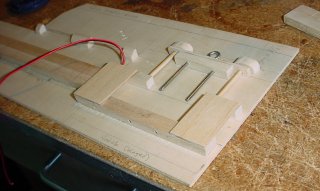 Next, I added shrouds to the boom guide rails to complete the sleeve. The right-hand
fuselage side (shown in the image) carries the power lines to the tail, so the shroud
helps to protect the male connector pins, as well as to ensure exact alignment of the
tail boom stick upon insertion. I repeated this on the left-hand side and also capped
off the locking pin rails.
Next, I added shrouds to the boom guide rails to complete the sleeve. The right-hand
fuselage side (shown in the image) carries the power lines to the tail, so the shroud
helps to protect the male connector pins, as well as to ensure exact alignment of the
tail boom stick upon insertion. I repeated this on the left-hand side and also capped
off the locking pin rails.
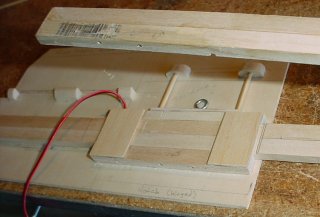 Now the boom assembly was tight and I had to tenderly sand the tail boom sticks for a
nice, smooth (but snug) fit. With the boom and locking pin in place, the assembly is
absolutely solid. Some additional reinforcement will be added to the major stress
points when the rear former is applied to the fuselage, and I will be adding hold-downs
and pull cords to the locking pins at some point. The right-hand side is shown here
again.
Now the boom assembly was tight and I had to tenderly sand the tail boom sticks for a
nice, smooth (but snug) fit. With the boom and locking pin in place, the assembly is
absolutely solid. Some additional reinforcement will be added to the major stress
points when the rear former is applied to the fuselage, and I will be adding hold-downs
and pull cords to the locking pins at some point. The right-hand side is shown here
again.
 I attached the fuselage walls to the tail boom and rubber-banded the assembly together
to see how it looked. It is beginning to look like an airframe! Gee, I might actually
fly it one day.
I attached the fuselage walls to the tail boom and rubber-banded the assembly together
to see how it looked. It is beginning to look like an airframe! Gee, I might actually
fly it one day.
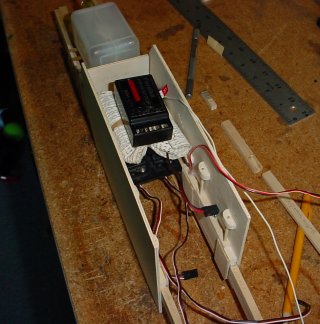 I took the mock-up one step further and dropped the fuel tank, servos, receiver and
batteries down in to see how things fit. Looks like I did my math right.
I took the mock-up one step further and dropped the fuel tank, servos, receiver and
batteries down in to see how things fit. Looks like I did my math right.
The airplane is beginning to actually look kind of like an airplane. I do not expect to meet my goal of completing the fuselage before Christmas, but that will remain my secret Christmas wish (did I just write that out loud?). I will have another weekend to myself, soon, so I should make some good strides then. I just need to work up (and re-discover) some designs (some of which were only in my head) and draw up a checklist so I don't miss any steps, especially since I am realizing some long gaps between building sessions. But I've got my eye on the sky, so to speak, and won't stop until this thing is in it!