FUSELAGE II
[10/15/2006]
I made good progress on the fuselage sides. Perhaps slower than expected (or at least desired), but I'll take whatever progress I can get. I managed to accomplish some pretty impressive feats of alignment without using any jigs to square things up. I think this airplane wants to be built.
 Remember the original boom sticks I made that I had to scrap? Well, I cut them up to use as the sticks
for the fuselage. Here you can see me attaching one of the sticks to the left fuselage wall. I mixed
up another good batch of epoxy. I finally did some reading (after all
these years) about epoxy only to discover that it is not as strong as I always thought it was. And in
scraping some dried epoxy off a (plastic) surface where I mixed it, I realized just how brittle it can
be. It will be plenty strong for the plane, as my 24-year-old plane was constructed using epoxy and
is still going strong today.
Remember the original boom sticks I made that I had to scrap? Well, I cut them up to use as the sticks
for the fuselage. Here you can see me attaching one of the sticks to the left fuselage wall. I mixed
up another good batch of epoxy. I finally did some reading (after all
these years) about epoxy only to discover that it is not as strong as I always thought it was. And in
scraping some dried epoxy off a (plastic) surface where I mixed it, I realized just how brittle it can
be. It will be plenty strong for the plane, as my 24-year-old plane was constructed using epoxy and
is still going strong today.
 The epoxy has hardened and the assembly looks good. I was surprised how closely matched the left wall
came out in respect to the right wall, considering I didn't use a jig to ensure they were parallel.
No complaints here!
The epoxy has hardened and the assembly looks good. I was surprised how closely matched the left wall
came out in respect to the right wall, considering I didn't use a jig to ensure they were parallel.
No complaints here!
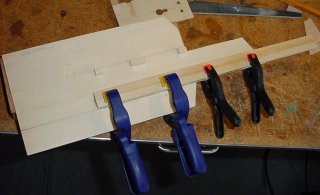
 Another batch of epoxy and a daring dual assembly process to attach both engine mounting blocks at
the same time. I was able to do it in time, and after quite a struggle of the pieces sliding about,
I finally stabilized them in proper alignment.
Another batch of epoxy and a daring dual assembly process to attach both engine mounting blocks at
the same time. I was able to do it in time, and after quite a struggle of the pieces sliding about,
I finally stabilized them in proper alignment.
 They'll do just fine! Another job well done. Looks like they were made for each other. Oh yeah - they
were!
They'll do just fine! Another job well done. Looks like they were made for each other. Oh yeah - they
were!
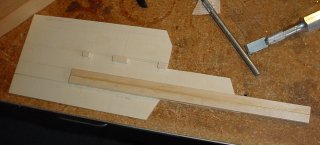
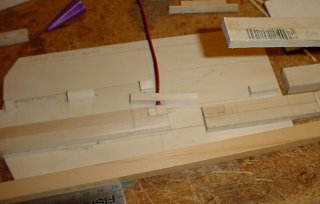 Here, I was sizing up and preparing to attach a couple pieces of the upper guide rail that will
help align the tail boom where it mates with the fuselage. I had to drill a hole through one to allow
passage of the wire for the power connector. A locking pin will replace the gap that you see between
the two upper guide rail pieces.
Here, I was sizing up and preparing to attach a couple pieces of the upper guide rail that will
help align the tail boom where it mates with the fuselage. I had to drill a hole through one to allow
passage of the wire for the power connector. A locking pin will replace the gap that you see between
the two upper guide rail pieces.
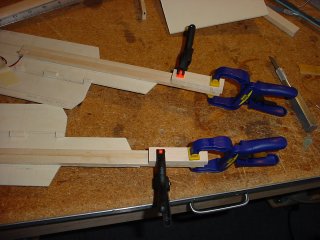
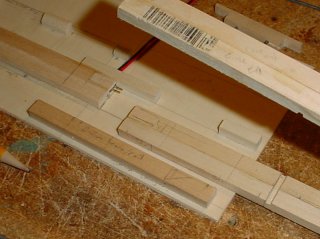 The upper guide rail pieces are attached and I am checking alignment with the tail boom and sizing up
the lower guide rail as well as pieces for the locking pin (partially visible at the top of this image).
The upper guide rail pieces are attached and I am checking alignment with the tail boom and sizing up
the lower guide rail as well as pieces for the locking pin (partially visible at the top of this image).
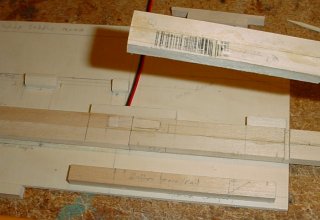 Here the boom stick has been set in place to check alignment. Everything was lining up quite nicely.
However, I realized I needed a couple more holes in the upper guide rails that were going to be extremely
difficult to drill in place. I rigged up something that worked with my dremel tool, but at one point it
got away from me and did some minor damage to the fuselage wall - fortunately, nothing critical, but it
is a permanent scar (not shown).
Here the boom stick has been set in place to check alignment. Everything was lining up quite nicely.
However, I realized I needed a couple more holes in the upper guide rails that were going to be extremely
difficult to drill in place. I rigged up something that worked with my dremel tool, but at one point it
got away from me and did some minor damage to the fuselage wall - fortunately, nothing critical, but it
is a permanent scar (not shown).
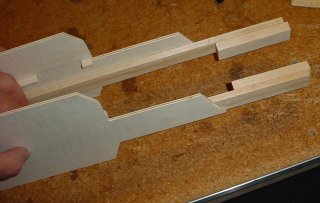
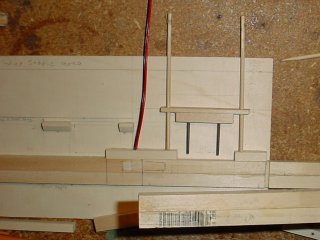 I built up a prototype locking pin as a proof of concept to determine how well my idea would work, and
how easy it would be to construct. The whole point of this locking pin is to remain part of the
fuselage so there are no loose parts to fall out and lose. By the way, the metal pins seen there are
simply nails with their heads cut off, pressed into the locking pin head block.
I built up a prototype locking pin as a proof of concept to determine how well my idea would work, and
how easy it would be to construct. The whole point of this locking pin is to remain part of the
fuselage so there are no loose parts to fall out and lose. By the way, the metal pins seen there are
simply nails with their heads cut off, pressed into the locking pin head block.